I am not an expert on land navigation, and can count on one hand the number of times that I’ve ACTUALLY used a map and compass in the last 10 years. I hesitate to say that those days are gone, but for me they are – or maybe more accurately – they never happened. I always have a compass, a list of bearings between waypoints/landmarks, and sometimes a paper map, but I primarily use my phone for navigating. (I highly recommend practicing with a compass and having a backup to your phone for obvious reasons.)
There are a number of navigation apps for both iPhone and Android including BackCountry Navigator, GAIA, ViewRanger and others. Each one has slight differences and can be chosen based on your intended application. I am most familiar with GAIA and will use that particular app as an example here. These apps make navigation easy. Really easy. Almost like cheating. There are lots of standalone GPS units out there that work great, but I find the user interface in conjunction with the screen size of my phone to be much easier. And since I always have my phone anyway for pictures, texting, taking notes, etc., a dedicated GPS unit is one more thing I don’t have to carry. Battery life seems to be the biggest drawback to phone use, so plan accordingly – there are some great external battery packs and compact solar chargers out there and for longer trips, I carry both. I don’t consider this a weight penalty for this system as I have other electronics that also need to be charged. One of the other items I always have is an InReach. It also has a GPS built into it and although the user interface is challenging and the screen/map resolution archaic compared to my phone, it works as a backup. It also allows for reliable communication to points of contact in the outside world, which can be critical for mission success (and even more critical when missions fail).
This is my first season with the National Park Service at Denali and I recently started briefing climbers heading to the West Buttress. I have been surprised by how many climbers have been asking for a detailed map with waypoints on the SAME day they are flying in to base camp. Sometimes I just get blank stares when I ask about a navigation plan - which worries me. Having a GPS in your pack is not a navigation plan. Having a GPS, route plan, list of waypoints and bearings, familiarity with your GPS and practice is a good start. Hopefully you have great weather on your trip and never have to worry about navigation – but don’t plan on it. My goal here is not to provide a user manual or endorse a particular product but provide a few basic details and cover some of the capabilities of this incredibly powerful technology. (There are some great articles written on this exact topic that go into much more detail written by some very knowledgeable people and I recommend you take the time to Google it, perhaps starting with Joe Stock and Luc Mehl.)
While navigation apps can be used as a primary trip planner/navigation tool, I often integrate CalTopo and Google Earth. Caltopo offers USGS 7.5-minute quadrangle maps and was developed by Matt Jacobs, a software developer and SAR volunteer in the Bay area who saw a major deficiency in mapping resources and the ability to layer various maps like trail networks and topographic maps in a single resource. One of the great features of CalTopo is the ability to add these various map layers like slope angle shaping (useful for getting a general idea of avalanche terrain) as necessary when planning a route. Google earth offers great 3D mapping with the ability to draw tracks and add waypoints on your intended route. Tracks can then be saved as .kml files and transferred to CalTopo as well as directly to GAIA GPS. Both CalTopo and Google earth are incredibly powerful tools and can be used for many things beyond the scope of this article.
It should be noted that there are 2 components to GAIA, the app and gaiagps.com. For trip planning purposes, I use gaiagps.com accessed from my computer to import routes or waypoints that I generated in either Caltopo or Google Earth. Once those routes and waypoints are uploaded, they will automatically sync in the GAIA app and show up on your phone.
Before taking your phone into the field -
Always download the appropriate map of the area you are travelling in before leaving wifi/data. This can be hard to remember, as the app will default to using wifi or data to view maps when you are in civilization. The process for downloading maps is as follows:
- Navigate to the home map screen
- Select the “+” symbol (Figure 1) to access the following menu (Figure 2)
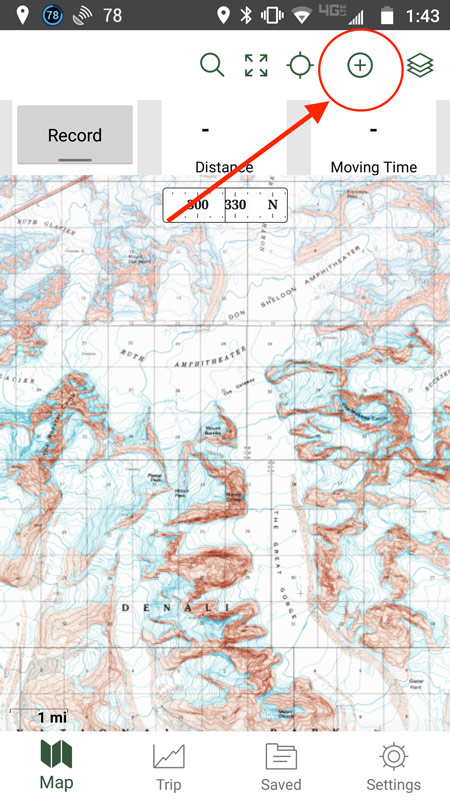
Above: Figure 1
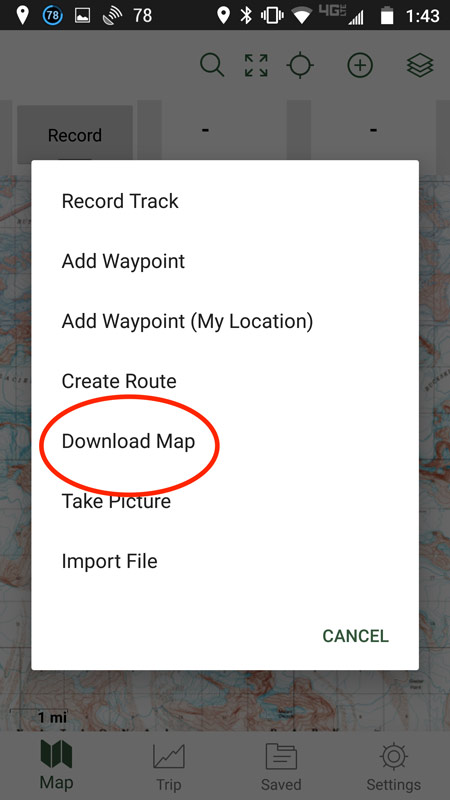
Above: Figure 2
- Expand or shrink the highlighted red box (Figure 3) to cover the desired terrain. I usually keep the Max Zoom at the default level of 15. It’ll go up to 16 but for general navigation, 15 seems to be adequate and it takes up considerably less memory on my phone. Make sure you click “save.”
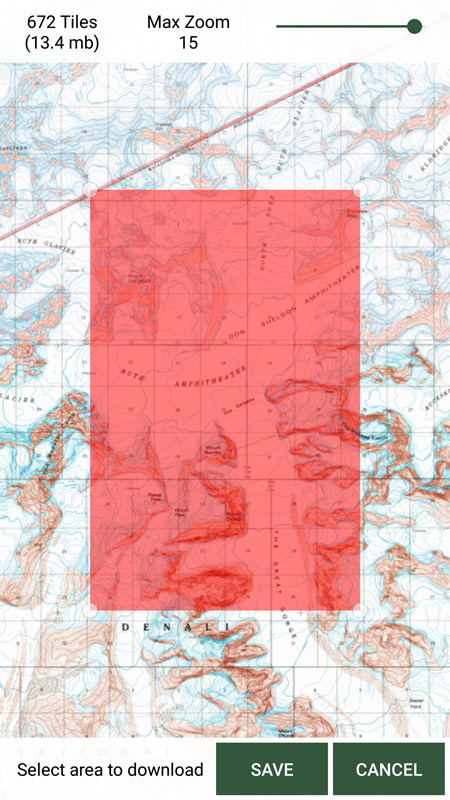
Above: Figure 3
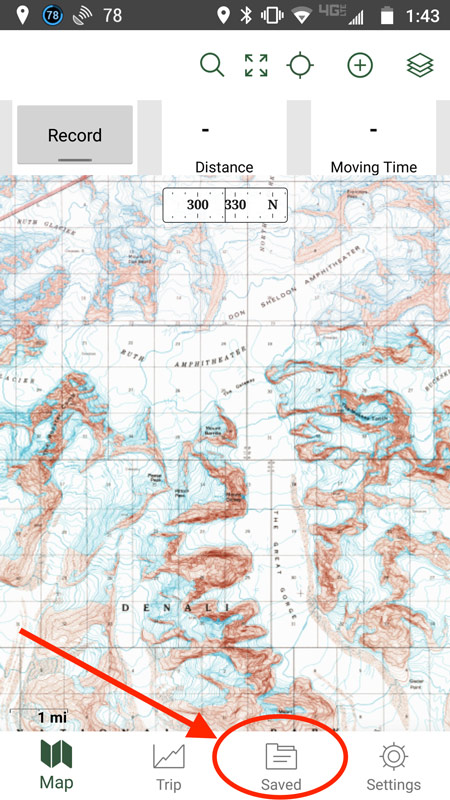
Above: Figure 4
- You can then select the “Saved” folder (Figure 4) and go to maps to verify that it has saved on your phone.
Once you are out in the field and have picked up a GPS signal on your phone, a cursor will show your location on the pre-downloaded map, similar to any other GPS unit you may be familiar with.
Route Planning
The following is an example of a simple route plan and the steps involved to get a track from Google earth to your GAIA app. Figure 5 shows a basic loop that we’ll use as an example with a waypoint incorporated for base camp. This line was generated by selecting the “Add Path” button in the top toolbar in Google Earth. By right-clicking on the loop and choosing “show elevation profile” the elevation graph shows up below that map and can give you a good idea of the steepness and elevation gain/loss along the way.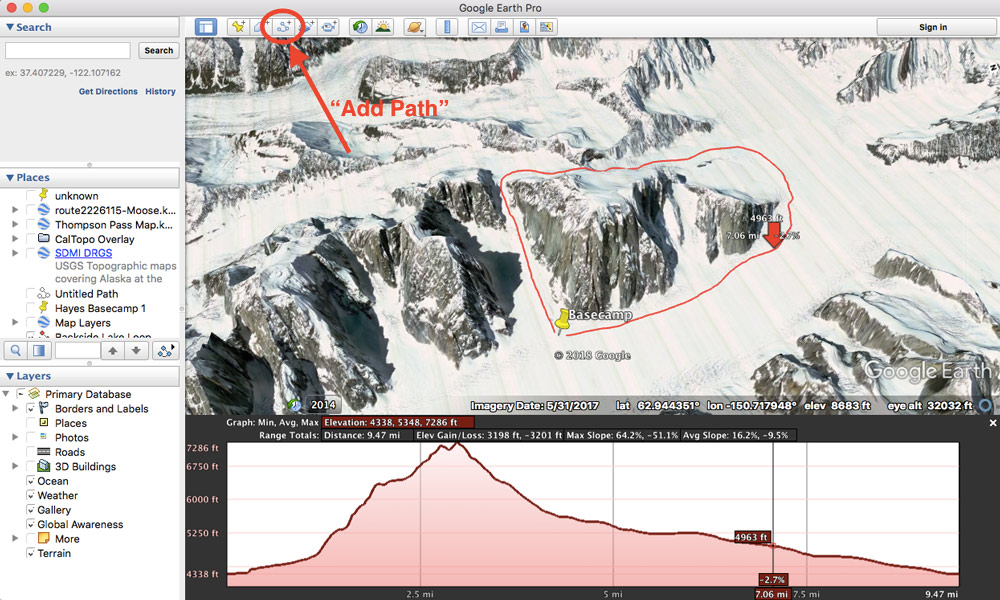 Above: Figure 5
Save this as a .kml file in My Places in your google earth account. If you do not, it will be located in Temporary Places and probably be lost when you close Google Earth.
Once you have created an account in gaiagps.com, open the menu and select “Upload.” Choose the file you saved in google (which should be a .kml) and open. You may have to repeat this step for the path and any associated waypoints, which may be separate files. Once uploaded, they should show up on the main GAIA map (Figure 6).
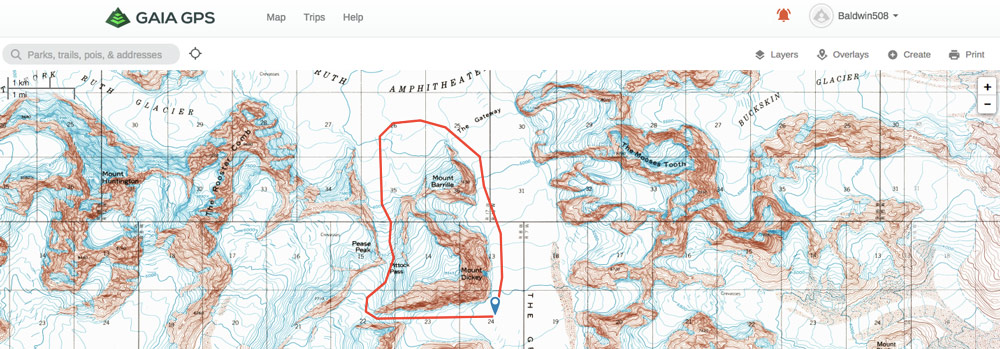
Above: Figure 6
From here, when the GAIA app is opened on your phone, it should automatically sync with any updates on your gaiagps.com account including routes and waypoints. (Figure 7) If it does not, you can manually sync within the app.
In general, it’s a great idea to have some sort of route plan and potential backup/contingency route before going on a trip. Navigation apps offer a pretty good platform to accomplish this. If climbing a popular route, a quick search can often produce a number of route tracks in .kml or .kmz form that can easily be uploaded and used or altered to suite a particular trip. (.kmz is simply the zipped or compressed .kml file) This is true for routes like the West Buttress, and with a big red line on the map, navigation is as easy as putting your cursor on the red line. Keep in mind of course that route tracks are often very rough overlays on potentially intricate terrain requiring micro navigation to avoid terrain features such as crevasses, small cliffs, cornices, avalanche prone slopes, etc.. That being said, route tracks offer a good place to start and it becomes very obvious if you start straying very far from your intended route.
Some of the most benign glacier terrain that we encounter can turn into some of the most demanding, challenging and frustrating to navigate in a whiteout. Without the obvious rocky terrain features and handrails on more technical routes that can provide contrast in bleak conditions, one can paddle through the proverbial pea soup relying on luck to avoid the next gaping icefall. It doesn’t taste good.
Have a system to deal with navigation in poor conditions, incorporate it into your planning and then practice with it.
