Last updated: March 8, 2022
Article
Walleye Crochet Pattern

Located in the lake-country of northern Minnesota, Voyageurs National Park protects 218,054 acres. This includes roughly 84,000 acres of water that provides opportunities to aspiring and experienced anglers alike. A total of 54 fish species have been found in the park's aquatic habitats, but Walleye remains a favorite.
Pattern by Ranger Hailey Burley
Difficulty: Easy – Medium
Size: Keep the size a mystery! Pick out yarn for your walleye and use the recommended hook size. Once your walleye is finished be sure to check the Minnesota DNR fishing regulations to see if your fish falls within the slot limit!
Material:
1. Crochet hook (use recommended size for your chosen yarn)
2. Yarn (Example walleye used a multi-colored yarn to create the pattern you see)
3. Fiber fill
4. Sewing needle
Abbreviations:
ch – chain
R – round or row
sc – single crochet
sl st – slip stitch
Number x sc – the number tells you how many times you make a single crochet in each stitch
inc - make two single crochet in one stitch
dec - crochet two stitches together with a sc
hdc – half double crochet
dc – double crochet
2dc – crochet two double crochet in one stitch
tr – treble crochet
2tr – crochet two treble crochet in one stitch
Note: This pattern is worked in the round. All fins are crocheted directly to the fish. A stitch marker can be used to mark the begining of the rounds or you can take a strand of yarn (running stitch marker) in contrasting color.
Head and body
Start with magic ring
R01 6 x sc (6)
R02 inc x 6 (12)
R03 (2 x sc, inc) x4 (16)
R04 (3 x sc, inc) x 4 (20)
R05 sc in each stitch (20)
R06 sc in each stitch (20)
R07 sc in each stitch. If you would like to use safety eyes place a stitch marker in this row. Insert the eyes when stuffing the fish on row 34. (20)
R08 (4 x sc, inc) x 4 (24)
R09 sc in each stitch (24)
R10 sc in each stitch (24)
R11 (5 sc, inc) x 4 (28)
R12 sc in each stitch (28)
R13 sc in each stitch (28)
R14 (6 x sc, inc) x 4 (32)
R15-26 sc in each stitch (32)
R27 (dec, 14 x sc) x 2 (30)
R28 sc in every stitch
R29 (dec, 13 x sc) x 2 (28)
R30 sc in every stitch
R31 (dec, 12 x sc) x 2 (26)
R32 sc in every stitch (26)
R33 (dec, 11 x sc) x 2 (24)
R34 sc in every stitch (24) Stuff fish
R35 (dec, 10 x sc) x 2 (22)
R36 sc in every stitch (22)
R37 (dec, 9 x sc) x 2 (20)
R38 sc in every stitch (20)
R39 (dec, 8 x sc) x 2 (18)
R40 sc in every stitch (18)
R41 (dec, 7 x sc) x 2 (16)
R42 (dec, 6 x sc) x 2 (14)
R43 (dec, 5 x sc) x 2 (12)
R44 sc in every stitch (12)
R45 (sc, inc) x 6 (18) Stuff again
R46 Flatten the piece a little bit and crochet the two sides together with 9 x sc, turn
R47 3 x ch, starting in the same stich with 2 tr, then crochet into the next stitches: dc, hdc, sc, sl st, sc, hdc, dc, 2 tr, 3 x ch, sl st in the same stitch in which the trebles were crocheted, cut and secure threads.

Fins
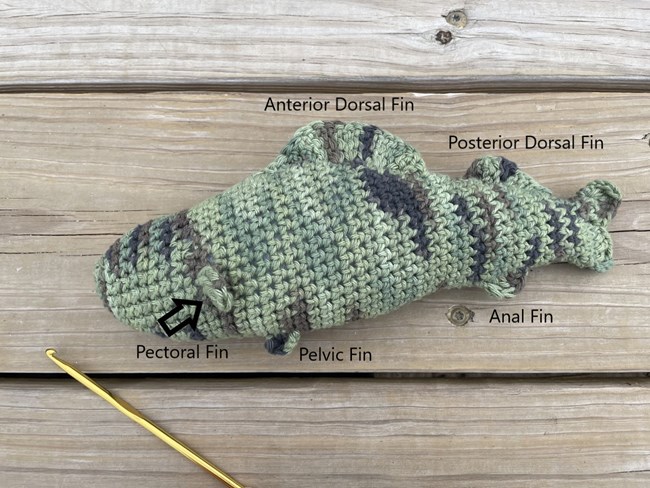
Placement of the fins can vary. Use the descriptions below or an image of a walleye to help place your fins.
Anterior Dorsal Fin A little bit after the hump of the fish.
R01 sl st, sc, hdc, dc, 5 x 2tr, dc, skip on stitch, sl st, cut thread and secure
Posterior Dorsal Fin Start 3 stitches behind anterior dorsal fin.
R01 sl st, 2 x 2tr, dc, dc, hdc, hdc, sl st. Cut and secure thread.
Pectoral Fin placed in the middle of the fish below where the hump of the fish begins.
R01 sl st, 2tr x 2, pull thread through and secure. Repeat on other side of fish.
Anal Fin Directly below posterior dorsal fin.
R01 sl st, 2 tr, dc, hdc, sl st.
Pelvic fin Directly below anterior dorsal fin.
R01 sl st, 2 tr, hdc, pull thread through and secure
